

|
377 More beating overheating tales Barrie Robinson (Gold Beige Metallic 3158) from Canada describes his journey to get his V8 conversion's cooling difficulties under control. (Apr 08) After driving an MGB GT on many of Canada's excellent highways I decided that a Rover V8 transplant would be the ticket. So started the "Rover V8" project. The result was to be a car that I could drive as an everyday car even through the harsh winters. This "driver" turned out to become an OMG fully restored, put-it-away-in-winter, boy's toy. I had read many times that MGB V8s and overheating went together. So right from the very start I had been careful to build it bearing in mind the need for efficient cooling. I had not read Bill McCullough's article on www.v8register.net so I just blindly kept to basics hoping that increased airflow and larger cooling capacity would do the job. Had I read Bill's words I would no doubt have tried some of his modifications but I had not - so my path was different, (a path hindered by a know-it-all-because-I'm-an-engineer attitude). However, my stint in the thermodynamics laboratory did dimly help in a sort of hazy way. Not wanting to destroy a perfectly good MGB, I obtained a 1970 MGBGT shell which was chemically cleaned, professionally repaired and modified to accept a Rover V8, then professionally painted. The Rover 3.5 litre V8 was bought from RPi of Norwich, Norfolk , with a mild cam, 10:1 compression pistons, duplex timing chain, mains bearing kit and lead-free head. The engine arrived safely by air, in a cardboard box! The intake manifold and carburettors were replaced by an Edelbrock's 2198 manifold and 1404 four barrelled carburettor. The latter is, in fact, a Weber as sold by RPi. Horsepower has been estimated at 200bhp and when I find the required facilities this will be tested. During the build the Lucas 35DE8 distributor was replaced by a standard Delco unit with Pertronix solid state "points" after modifying the drive. This allows for easy replacement anywhere in North America where Lucas "dizzies" are very scarce. Increasing the airflow through the engine bay The first thing I tackled was the need to increase airflow through the engine bay because the V8 lump did dominate the space. The radiator hole was fixed so looking there was no help but the black plastic egg crate grille was replaced by stainless steel mesh available at www.britcot.com . It was obvious that "block huggers" were an absolute no-no. These exhaust manifolds are fabricated to keep close to the block and not to go through the wings (fenders). Such units were the original concept but cooling requirements spawned the "through-the-wings" exhausts. It was also obvious that holes in the wing (fender) would do little to weaken the structure. Being an engineer helped me realise this fact - stress in the centre where the holes would go would be minimal. There are recommendations that the holes in the wings should be reinforced but mine were not because it never crossed my bodyman's mind! And there are those that maintain this is not necessary. So far no problems after 3,000 kms and I have not heard of any failures due to not welding-in the stiffening. I bought through-the-wing exhaust manifolds, primaries and secondaries, from Australia because they looked sleek and sexy. I am a great believer in that good engineering looks sexy!! The hole in the wing through which they went gave me extra air flow as the wheel well is a low pressure area thus hot engine air would be sucked out. Next area was the radiator The next area was the radiator. I had done a survey of MGBV8s courtesy of the splendid www.team.net system which allows British car owners to correspond with ease. What showed up was that those using the bog standard MGB V8 radiators had no problems. This finding was found to be wrong several years later when I heard some reluctantly confess that overheating was evident under some "hot" conditions like traffic jams on a baking hot day. I wanted my V8 to sneer at driving though hell in a traffic jam up a 4 in 1 gradient. Thus it was obvious a more efficient radiator was required and a brass/copper "heavy duty" one was bought from D&D Fabrications of Almont, Michigan. Needed a powerful cooling fan and a thinner water pump This radiator looked splendid but it had one big drawback - it was fatter than the standard unit! I had already decided that I would mount the largest most powerful electric fan that I could find - but there was not enough clearance for it. Putting in a smaller electric fan was not an option so something had to move - or get reduced. I looked at the water pump that was preventing the fan from installation. I was sure it could be made thinner and so it was. 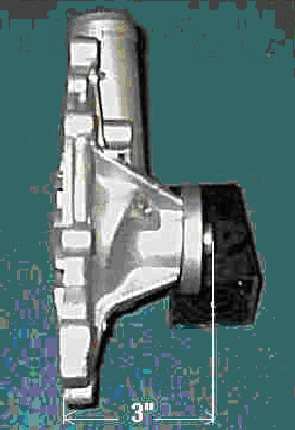 Standard water pump machined to 3 inches deep. (Photo: Barrie Robinson)
An extremely sympathetic Don Lopez of Margus Auto Electric Exchange Inc in Los Angeles machined a standard water pump and produced a 3" water pump for me (from 4"). This extra inch allowed the Perma-Cool 14" 2,970 CFM fan, which cost me a shade under US$200, to slide in after the top of the radiator was raked forward. The fan had a mere 3/16" clearance which was a bit of a worry but its robust and very industrial look seemed to compensate somehow. Road testing the new setup So now with through-the-wings exhaust, heavy-duty radiator and a mighty powerful fan we were ready for the road. I decided to motor down to the Henley Regatta at St Catharines, Ontario, where "my girls" VIII rowing crew were racing. It took less than 40km to show all was not well but I got there after some worrying spluttering problems. The engine bay got so hot that the Edelbrock (Weber) carburettor was too hot to touch. The fuel was overheating and the engine died frequently.  Just to make things interesting, in St Catharines, a bolt fell out of a steering knuckle and wedged the car in left turn only. This made me mount the sidewalk and neatly park on an immaculate lawn which later turned into a party - but that's another story. On the return home the problem got worse as the body could absorb no more heat. |
Back
to Contents listing
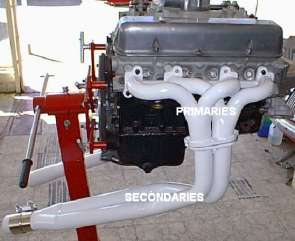 V8 power for a transplant. (Photo: Barrie Robinson) Reducing engine bay heat with ceramic coatings on the exhaust It struck me that as the bay was too hot the answer may lie in not letting heat get into it. I found a one-man-band chap who was one of three Canadian certified ceramic coating engineers for aircraft. He did both primaries and secondaries on the exhaust with a double internal coat. The result was dramatic and all seemed to be well. But as one can guess the saga was not yet finished. Our trip to the British V8 meet in Tennessee - and yes, I did drive the Tail of the Dragon with 318 bends in 14 miles - I found that, though normal driving was fine, there was a problem in slow traffic. The needle slowly climbed and after 10 minutes of crawling I felt it would be safer to pull over and let the engine cool. So I cancelled my trip to Hell, as it was apparent that my cooling system would not cope. Aluminium radiators During this trying period, which had now spread over two years, I kept hearing about the legendary performance of aluminium radiators. Not having read the fine print of Bill McCullough's dissertation (see V8NOTE374) I did not experiment with heater flows, radiator caps or such so I drew up a design for a custom built aluminium radiator.  Design for the bespoke aluminium radiator - a larger copy can be downloaded. (Barrie Robinson) More As I was building from a rescued body I had no "pusher" fans installed, so a "puller" fan was deemed to be the way to go. The height and width of the radiator was taken from the size of the D&D one installed - 18" by 18" but I was concerned about the placing of the electric fan. I designed in a 14" L shaped strip bracket either side of the unit on the engine side thus allowing me to trial fit the fan, arrive at the best position then drill and bolt.  Custom designed aluminium radiator. (Photo: Barrie Robinson)
I had several quotes for making the radiator but went with Howe's Racing Enterprises of Beaverton, Michigan who charged me US$434. It fitted perfectly and I easily positioned the fan in the optimum spot. Incidentally, the new radiator was thinner by a massive 1/8" - but every bit helps. The reason for the efficiency of aluminium radiators is due to the mechanical strength of aluminium as opposed to copper. Thus the copper tubes can be replaced by thin 1" rectangular hollow "bars" giving far more surface area. This ability more than amply compensates copper's thermal conductivity advantage of 230 BTU/hr-ft compared with aluminium's 137 BTU/hr-ft After installation some tests showed that it seemed to be doing the job which was lucky as next day I was off for the British V8 do in Willoughby, Ohio. But next day was a disaster - again. Another road test On the way to the border the temp gauge, after a run of 30 minutes, rocketed to too-damn-hot. I found my radiator seriously short of fluid. Hoses checked, air lock possibilities checked, water leaks checked, and all other areas checked with no solution. So I carried on with water contained in plastic water bottles taken out of service station trash cans. This, by the way, is the only good thing I have ever said about this insane waste of plastic by idiots who do not realise that bottled water is not as toxic free as tap water. What idiot pays more for water than gas - when better water is free? However, the finale was reached at the border. Not in the large queue but right before the wicket! The radiator spewed water everywhere in a sort of flaming pink steam stream - the colour courtesy of the remains of anti-freeze. The US Border guards descended on the MGB but rather than being bitter and twisted they laughed and said such an event was common. They pushed me through the wicket after being scrutinised by a serious faced inspector and sniffed by a large drug seeking dog. After another 30 minute run and shortage of water again, I gave it considerable thought. After a pause for thought, a solution whilst playing with the radiator cap suddenly came to me - and this is where I should leave it and make the reader guess the problem but that would be copping out of relating my stupidity. You may have guessed but here is the solution. I was not tightening the radiator cap far enough - it has a second "turn". With this modification in place all, and I mean all, is well. I go to the travel agent to-morrow to book for hell!
|
|
|
Copyright
reserved by the V8 Register
|
||