390
Battery conversion cures
V8 hot start problem
Bob Own provides a
sequel to his recent V8NOTE388 on how he solved a
hot start problem. (Oct 08)
The
problem
For some time my V8 has been giving some starting problems when
hot. I had cured an ignition problem that caused the engine to stop when hot -
see V8NOTE388 - but this second problem was a "lazy"
starter which gave inadequate cranking speed when the car was very hot, although
it gave adequate cranking speed when cold. A typical engine needs to crank at
more than 90 rpm to start.
Why should it occur only when hot?
The V8 starter and solenoid are close to the exhaust and so can get very hot if
the car is idling or in slow moving traffic, especially in hot weather. A heat
shield was fitted by the factory but often this is corroded or missing. Clive
Wheatley does an excellent aftermarket RV8 heat shield which can be used on an
MGBGTV8. You need to use a cut down fixing to allow you to fit it with the exhaust
in place. However, the heat shield is only partly effective in reducing the temperature
of the starter/solenoid. When the copper windings get hot the resistance increases
and the current passed for a given voltage decreases. The solenoid thrust and
the starter torque are both proportional to the current passed. The resistance
of copper is proportional to the absolute temperature (0C is 273 absolute or 273K).
So in going from 17C - 100C (290K to 373K), the resistance goes up by nearly 30%
so the starter torque/thrust drops by 30%. If you compound that with a less than
pristine battery that has a cranking voltage that may also be down by 30% then
you have only half of the design torque or thrust. You might think that half full
power should be enough, but this overlooks the two stage operation of a pre-engaged
starter motor.
Pre-engaged starters
When the starter relay
feeds current to the starter solenoid as a result of you turning the starter key,
two solenoid windings are energised, one in parallel with the battery and one
in series with the starter motor. The one in series with the motor passes quite
a high current and will cause the motor to rotate slowly while the solenoid operates
the lever that pushes the starter pinion into mesh. When the pinion is fully in
mesh and the solenoid is at the end of its travel, the main starter contacts are
closed causing the battery to connect direct to the starter and the full starter
power to be developed. Inadequate current through the solenoid, tightness of the
solenoid or damaged solenoid contacts may prevent correct operation of this final
stage.
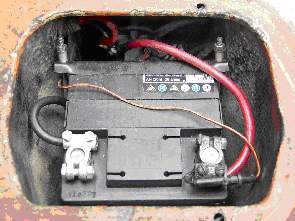
Driver's side battery compartment
viewed from rear. The battery isolator is just visible near top of picture; thin
fused lead feeds the alarm so that it still operates with the isolator OFF.
Curing the problem
When exhibiting "lazy cranking",
with the final stage of connection not being reached, if the V8's batteries were
jumped to another car's battery (usually poor Malcolm Sayers when I was in Italy!)
the starter would zip away and the car would start straight away. So at least
I had identified that a significant part of the problem was insufficient "welly"
from the batteries. I resolved to sort this problem when I got home. I would change
the batteries first and then, if necessary, do something about the starter/solenoid
- not something to be considered lightly on the V8.
Original 6V batteries
The factory MGBGTV8 was originally fitted with two 6V batteries connected in series
to give 12V. This is the same arrangement as in the 1.8 MGB of the time. However,
the V8 engine requires about 50% more starter torque than the 1.8 model, so starting
is likely to be more "iffy", even without the effects of high exhaust
temperatures on the starter/solenoid. Whilst preferring originality if possible,
I was getting a bit fed up with the 6V batteries. These were less than 3 years
old and already tired; and they're not cheap. So I decided to weigh up the pros
and cons of various approaches.
6V in series versus 12V in parallel
At first sight there would seem to be little advantage in using two 12V batteries
in parallel over two 6V in series. Other things being equal, the same volume of
battery would have the same energy storage. However, most development in the last
40 years has been on 12V batteries so the 6V batteries are still essentially as
supplied in the 1960s, whereas there is a wide choice of modern more advanced
12V batteries.
Another factor which is often overlooked is the effect
of imbalance between the batteries. Batteries are charged by the alternator to
a fixed "fully charged" voltage. This corresponds to about 2.4V per
cell or 14.4V for the 6 cells of a 12V battery. Each of the cells should have
the same capacity and then they will become fully charged after the same amount
of current has passed. If some cells become charged before others the higher terminal
voltage will reduce the voltage available to the other cells leaving them undercharged.
In a single 12V battery all the cells are manufactured together at the same time
and are likely to be closely matched. With two 6V batteries, although nominally
the same, the batteries may differ by the full tolerance range of the production
process.
A usual electronic rule of thumb is that components manufactured
together will only have one tenth of the full production spreads. So your two
6V batteries could have significantly different capacities. Connected in series,
the low capacity or "poor" one would charge first and prevent the higher
capacity or "good" one from ever becoming fully charged. A lead acid
battery degrades if it is not kept fully charged, so if you have a situation where
one of a pair of batteries is not getting a full charge then that could have a
damaging effect on that battery.
Batteries in parallel must have the
same terminal voltage, so it doesn't matter if they have unequal capacities: they
will both be fully charged when the terminal voltage reaches 14.4V. So it looks
like there are good reasons to choose two 12V in parallel rather than two 6V in
series.
The
Kai Knickman 12V battery conversion
Kai Knickman did a 12V conversion
using two 12V batteries in parallel which he wrote up in V8NOTE357.
This appealed to me as, unlike the single 12V battery conversions, it involved
no modifications to the battery box and it gave more power. Kai used two Bosch
4FN batteries. However, he cautioned that you had to live with the fact that the
batteries in the back were designed for use in a Fiat Panda! Kai, it's even worse
- my internet searches reveal that this size of battery is also used on the Piaggio
Ape (the Italian "Tuk-tuk")! Ah, well; never mind. In fact the battery
is used on several Fiats - for example the
Fiat Punto Mk2 1.2, |
Cinquecento, Panda 1.1 and 1.2
2004 on, the Seicento 1.1
and Bravo/Brava 1.4. It is also used on the Citroen C1, C2 and C3 1.1, Peugeot
107 and 1007, and Toyota Aygo, so it should be widely available. The batteries
are made by several manufacturers and the size is given variously as 002L, 202,
002FS or DIN54059 - I was surprised Kai didn't quote the latter!
Prices
vary from about £30 each for the cheapest brands to around £60 for
the dearest. With batteries you largely get what you pay for. The dearer batteries
tend to have a three or four year warranty. I opted for Yuasa "Pro"
202s which my local motor factors sold to me at £83 for the pair - that
was with a discount for two! A comparison between the original 6V and Yuasa batteries
is given in the table below.
| Parameter |
Original
6V | YUASA
202 | Variance |
Size
length (mm)
width (mm)
height (mm)
|
175
175
200
|
175
175
175
|
height
is
25mm
lower
or -8% | | Volume
(litres) | 6.125 |
5.36 |
-12.5% |
| Weight
(kg) | 11.5 |
10 |
-9% |
Capacity
Total Ah | 56 |
70 |
+25% |
Energy
density
Wh/litre | 110 |
157 |
+42% |
| CCA*
total | 270 |
480 |
+78% |
| Warranty
(yrs) | 1 |
3 |
+200% |
| Total
cost | £124** |
£83 |
-33% |
CCA = Cold
cranking Amps, roughly the current the battery can deliver for 1 minute at sub
zero temperatures before its terminal voltage falls below 1.4V per cell (approximately
8.5V for a 12V battery). At low temperatures the current generating chemical reactions
within the battery proceed more slowly. The CCA is the key measure for starting
ability - more useful than straight capacity. Capacity is more useful, for example,
in working out how long the battery would run your lights.
** Moss
price, excluding carriage.
The table indicates that the two 12V Yuasas
vastly outperform the original two 6V batteries arrangement showing their superior
technology. What is more they do this at a cost which is a third lower and have
a longer warranty. No contest really . . .

View of new batteries from
the front. The isolator switch is lower left; new earth strap is upper right of
the driver's side battery compartment. Original earth strap used in the nearside
compartment.
Installation
notes
Remember that for safety the first thing you do is remove the earth
lead from the old batteries and the last thing you do is connect the earth leads
to the new batteries.
Many years ago I fitted a battery isolator switch
to the bulkhead in front of the driver's side battery, so my installation was
a little different to that on Kai Knickmann's V8. Like Kai, I concluded that the
best layout was with connectors at the back with an additional earth strap to
the existing hole at the back of the driver's side battery compartment. When making
that connection, remember to get down to clean metal - I used a cup type rotary
wire brush in an electric drill. However, I decided to take my second positive
battery lead from the isolator so this lead was to be terminated by a large crimp
ring connector at the isolator end and the battery clamp at the other. Lacking
a suitable crimp tool, I stripped the red heavy duty cable and inserted it in
the crimp ring sleeve and then "crimped" it by using the body of a 5mm
drill laid across the sleeve at right angles and then squeezing them together
in a vice. You can test this by putting the ring end in the vice and seeing if
you can pull the cable out. The cable is then cut to a generous length and a suitable
rounded pen top is pushed over the cut end to facilitate pushing it through the
corrugated conduit linking the two battery compartments. Then cut to length, strip
the end and connect the battery clamp. You can use the same "crimping"
technique on the earth strap if you are not using a pre-made one. A pre-made cable
cannot be used for the positive link as it will not go through the cross tunnel
conduit.
To fix the batteries I adopted Kai's suggestion of cutting down
the J bolts and using a spacer to allow for the reduced battery height. I used
sawn off lengths of 10mm dia 1.6mm aluminium tubing (from B&Q). The J bolts
now fix on the front side of the batteries.
Before and after
With the original batteries and a hot engine, the
solenoid would fail to switch to full power after engagement and the resulting
slow crank was insufficient to start the engine. Even at lower temperatures the
slow initial crank was often evident before relief at the onset of the fast crank
at which the car started. With the Kai Knickman twin 12V in parallel set up, the
fast crank appeared to be immediate and the car starts with no problems at all.
If after a long rest, there is the usual V8 short period of cranking as the inlet
manifold fills with fuel air mixture. Not having an instant start is not a problem
as this helps oil pressure to build prior to fast running. When starting the car
after hot from recent running, the start is almost immediate. My existing starter/solenoid
is performing just fine with the new battery set-up so the need to cross this
bridge with replacements is now sometime into the future.
A recent email
from Kai confirms that his new 4 litre high compression engine he has fitted also
starts easily even in the coldest weather. A few measurements show why there is
such a big improvement. The actual steady state cranking current from the Yuasas
was measured at 180A at 20C ambient with a cold engine (king lead removed to prevent
ignition). At this current there was 0.4V drop in the starter feed cable. The
original batteries produced an initial 8.8V at the starter under these conditions,
so were clearly down from their specified CCA. The Yuasa batteries produced 10.8V
at the starter. So, from an initial fully charged off load voltage of 12.8V the
original batteries dropped 3.6V under starter load whereas the Yuasa batteries
dropped just 1.6V - a dramatic improvement. The 23% higher voltage at the starter
makes a big difference; 23% higher voltage gives 50% more power.
Conclusion
I am delighted with this conversion and would strongly recommend it. It gives
much better starting performance, higher capacity, lower cost and likely longer
service life and involves no fundamental modifications to the car. These modifications
could easily be returned to the original set up should exact originality become
an issue. It has no downside. |