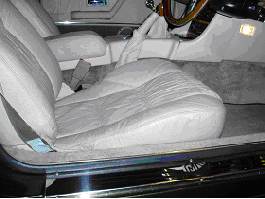
| 233 Lowering an RV8 seat If you are tall in the body like Roger Davies from Berkshire then finding a way of lowering the driving seat is essential. Roger posted a useful note on how he did the job. (Jan 06) I've just carried out a simple modification to the seats in my RV8 which has allowed me to lower the seat height by a whole inch and a half. I now get a view of the road ahead instead of a view of the sun visor. This modification is not suitable for everyone but can be considered by those who do not use the seat slider mechanism, as this part is removed. It may be worth considering if you are 6ft or over and only you or similar height people drive your car and do not need to alter the seat position in the future. Let me explain in more detail. 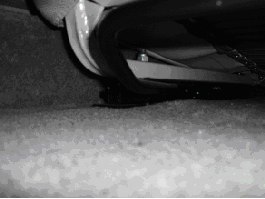 Fig.1. View of unmodified seat from below. I soon realised after first driving the RV8 that I never used the seat slider mechanism as the seat was always as far back as was practical. When I looked under the seat I saw that the seat was attached to the slider by four bolts and the slider was attached to the floor by four bolts, see figure 1 below. It also appeared that the bolts holding the seat were in line with the bolts holding the slider to the floor. It occurred to me that in theory the slider could be removed and the seat attached directly to the floor. After removing the seat and the slider, it turned out that this was indeed the case. Figure 2 shows the lowered seat position after this modification was carried out. Compare this to the original seat height position in Figure 1. 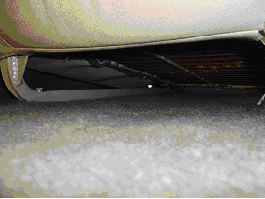 Fig.2. View of modified seat from below. At this point I should add that it's is not quite that simple, becuase whilst the holes line up, fixing the seat in this position would locate it a bit further forward than is needed. In order to locate the seat further back it is simply a matter of drilling four new holes in the seat runners approximately a couple of inches in front of the existing holes. | Let's
look at the procedure in more detail Firstly remove the seat. The workshop manual advises that the best way to do this is to remove the seat and slider in one go. It states that you should slide the seat as far forward as possible and then remove the rear Allen screws holding the slider to the floor. It then advises moving the seat as far back as possible and removing the front Allen screws. When I tried this I found there was a problem in that the seat would not slide far enough forward to expose the rear Allen screws completely, so I took a differ a different tack. I removed the seat first and then the slider in the following way. Firstly pull the seat cushion aside to reveal the rear nuts holding the seat to the slider as in Fig. 3 below. 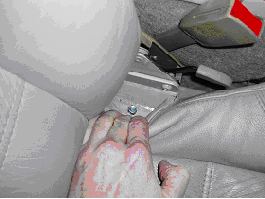 Fig.3. View of existing rear seat fixing nut. Remove this nut and the nut on the opposite side, accessed in a similar manner. Next, remove the front 2 nuts which are a little trickier, but can be seen in figure 1. These are removed fairly easily once you get yourself comfortable with your head in the footwell! It's now a simple matter of lifting out the seat to expose the slider which is now easily removed as all Allen screws are exposed. I suggest trying to remove the seat and slider usingthe workshop manual approach first, which is probably quicker than my approach, but if you encounter the same problem as I did then try my method. Once the seat and slider are out, it's time to drill the new holes in the seat runners. Firstly turn the seat upside down and lay on the bench. The two new front holes in the seat runners need to be made as close to the front of the seat as possible while still being on the flat bottom part of the runner. See fig. 4. 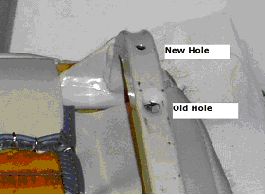 Fig.4. Location of new fixing hole. Mark one side first and measure the distance from the old hole to enable you to mark the other side in the same position. Now use the bottom part of the seat slider mechanism as a template to mark the position of the rear holes as in figure 5 below. | 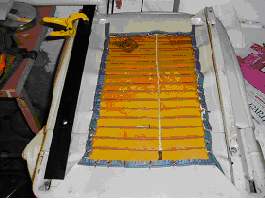 Fig.5. Slider mechanism as template for new rear holes. Drill the holes, starting with a small drill first and working up to a 9mm. This allows a small amount of play with the 8mm bolts in case the holes are slightly off line. Taking care to get these holes in the right place will allow easier refitting of the seat. 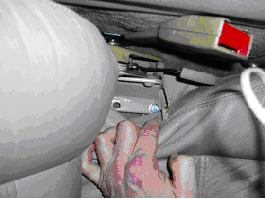 Fig.6. Location of new rear seat fixing bolt You
are now finished and ready to replace the seats back in the car. Please note at
this point that the old Allen bolts which held the slider to the floor are a little
short to be reused for securing the seat frame as the seat is a box section where
the slider was a solid plate. I purchased eight new 8mm bolts which were 50mm
long with washers from Homebase for £1.99. These were hex bolts as opposed
to the original Allen type bolts but worked just as well. I used washers so that
the seat frame was better supported. Fig. 6 shows the new bolt position. |
| RV8
information and support See our popular RV8NOTES listing, information gateways, top tips, spares and services specialists and spares for sale and wanted. | RV8
Workshop Notes Information Gateways Top tips for new RV8 enthusiasts | Technical
topics Spares & services specialists V8 spares for sale and wanted |