349
Front windscreen replacement on an MGB Roadster
Bill McCullough (Green Mallard 4313) felt his article is really for
any MGB Roadster owner but as there is a growing number of V8 conversions
in Roadster shells, it might be appropriate to have it somewhere for
general information. (Apr 06)
Four days after
an MOT success with my V8 Roadster, I noticed a fresh crack in the
front screen, a few inches first but right across the screen within
three days. Not having replaced a Roadster screen since reshelling
this car, and that was before the actual fitting out, I looked at
various sources including the MG and Haynes manuals for guidance.
The suggestions were rather daunting and included removing the complete
dash and draining the coolant system. There is a short cut.

Top and lower windscreen surround securing bolts.
(Diagram: MGB Workshop Manual AKD3259)
Disconnect the
battery. Remove the upholstery trim below the windscreen on both
the passenger and driver sides - a total of about 10 self tappers.
Remove the glovebox (but not the actual 'door') and the small support
bracket, again about 10 self tappers. This will give you visual
and physical access to the top bolt on the passenger side
that secures the windscreen frame on the passenger's side, via the
aperture provided by the removal of the glove box - its difficult
but a 9/16" socket on a 2" extension with a universal
joint with ratchet will do the job, the lower bolt removal
is straight forward with the same socket.
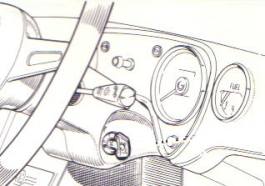
Need to remove the fuel gauge on the driver's side. (Diagram:
MGBGTV8 Driver's Handbook AKD8423)
The situation
on the driver's side calls for the removal of the fuel gauge from
the dash, it can simply hang on its wiring to the outside of the
dash. Access to the top bolt on the driver's side windscreen
frame is via the aperture provided by the removal of this gauge.
The same extension and 9/16" socket are used, it is difficult
but achievable. The lower bolt is straight forward removal.
With these 4 bolts removed and the support rod disconnected from
the top of the dash (two bolts) the whole windscreen frame can be
removed from the car. Once I had worked it out, the removal took
less than 20 minutes.
Removal
of the screen from the frame was not a problem - but if at all
possible keep the old screen intact and compare it against the replacement
unit before attempting to reassemble the frame - the first screen
I tried was approx 3/16" deeper on both lower corners and although
I did get it into the screen frame I could see there would be problems
when it came to installing the assembled frame to the bodyshell
- with the screen rubber already fully compressed at two points
I was convinced that the glass would fail. Back to my friendly MG
parts supplier and a quick check on another new screen produced
a visible improvement. A refit of the replacement screen solved
the problem.
Refitting
the reassembled frame to the body has the potential to be very
difficult, but it's really a reversal of the above - that's what
they say in the manuals. First of all cut screw driver slots on
the faces the two top bolts, and in this way while you helper applies
pressure to the windscreen pillars you can use the same apertures
to apply a screwdriver and get the initial few threads entered.
The next time I do this job (not soon I hope!), I will drill out
the threads on these two top holes and use
|
the bolt and nut
technique - there is ample space to attach the nut viewed from the
door aperture, this would remove the need to get these bolts started
on the threads. There is a limited view of these top bolts if you
pull down the rubber door seal at the top where it bridges the gap
between the side of the dash and the door - you can see sufficient
to ensure your 9/16" socket is entered onto the bolt. The alternative
is to lie upside down with your head in the footwells trying to operate
a torch and spanner at the same time.
I would mention that the new windscreen rubber I obtained was not
satisfactory. It was too long by about 6" and as a result would
not stay on the glass making it very difficult to assemble the frame.
In addition the rubber did not make provision for the sharp corners
at the bottom of the screen. The old rubber which I purchased 9 years
ago, was properly moulded at the lower corners and a tight fit all
around the screen, this old rubber was reused and a smear of 'swarfega'
made the whole assembly quite straight forward.
Fitting the
rubber sealing strip to the bottom rail
All the above is good news, but there is one item of bad news and
that involves the aluminium bottom rail on the screen. Does anyone
have a shortcut to fitting the rubber sealing strip?
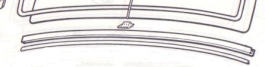
Sealing strip and the aluminium bottom rail. (Diagram:
MGB Workshop Manual AKD3259)
I spent longer getting the rubber seal fitted to
the windscreen frame than fitting the complete assembly to the car!
It is the rubber seal that fits between the screen assembly and
the car body across the width of the screen. I spent longer getting
this seal fitted to the windscreen frame than I did fitting the
completed assembly to the car!
The windscreen
removal and refit procedure described above has proved to be much
more user friendly than that suggested by the various manuals.
I found that a short ratchet with a 1/4" or 3/8" square
drive and universal joint and socket is the most appropriate. In
addition I did strip the threads on one of the bolts that secure
the central rod support bracket to the dash top - see above. Easy
to solve, pull out the two plastic fresh air vents in the middle
of the dash and you have a clear view of these two bolts and nuts.
The windscreen
I obtained was manufactured in Finland and is relatively inexpensive
at £60. However there has to be a question mark over their
quality control, so retaining your old screen for comparison could
be important. But why did my original screen break after nine years?
I have suspicions that the thick rubber seals that fit between the
quarter light and the screen uprights were too thick, causing the
whole frame to flex every time I closed the door or drove over a
rough road. New quarter light seals have been modified to ensure
they do not cause the same problem again.
I hope the above
may help solve a few problems for fellow members.
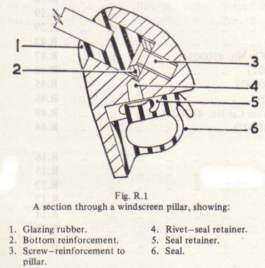
Section through the pillar of the windscreen surround
assembly. (Diagram: MGB Workshop Manual AKD3259)
|