|
V8
Roadster Conversion project - from dream to reality!
V8 Roadster Conversions are very popular with V8 enthusiasts and come in
a variety of specifications. Here Geoff King (Tartan Red 4309) from Kincardinshire
provides a fascinating tale of how his project was conceived and carried out to
produce an award winning V8 Roadster with a wonderful specification and performance.
Geoff converted his rusty 1972 MGBGT 1800 to a V8 Roadster over a three year period
and completed the project in August 2002. It has a 3.5 litre injected engine with
a five speed gearbox, independent rear suspension, unequal length double wishbones,
and coilover dampers front and rear. The brakes have been upgraded with disc brakes
front and rear, with four pot calipers on the front. It looks standard but it
isn't! (May 04)
How did the project come about?
While in the local library one day, I noticed Roger Williams' book 'How to give
your MGB V8 power'. The sound of a V8 in a Rover SD1 that I had some years ago
and its smooth effortless power came back into my mind and I thought how I had
missed my MGB during the time our family were growing up, but now the seed was
sown and I knew what I was going to do. I would build a Tartan Red V8 Roadster
with alloy wheels, like the one that I had in my carefree youth but with enough
power to keep up with the traffic of today. I knew that new MGB shells were being
manufactured and my plan was to buy a cheap roadster as a donor and build a car
using a new body. The car would look original but it would be modern under the
skin with electronic ignition and fuel injection, up to date suspension and brakes
and the "toys" that we expect in many cars today. First
a complete Rover SD1 was purchased for its V8 engine and 5 speed LT77 manual gearbox.
I overhauled the 3.5 engine and fitted new rings, bearings, rocker shafts, 3.9
cam and duplex roller timing chain. To help the engine breathe I smoothed and
matched the ports in the heads and fitted the latest 'Vitesse' type valves. The
gearbox was rebuilt with new baulk rings and bearings. A
suitable donor roadster proved to be elusive in Scotland (by suitable I mean cheap
and tax exempt) and I eventually bought a 1972 GT in Dumfries. The 1800 MGB GT
had been off the road for a couple of years when I purchased it at |
the end of May 1999
and it definitely was not roadworthy, so I towed it back home to Banchory on a
trailer. It had severe corrosion in all the usual places but that didn't matter,
the car was stripped bare in a weekend and the rusty remains discarded. On the
garage floor I was left with a front crossmember, rear axle, the steering rack
and column and a four-cylinder engine with an overdrive gearbox. I also had the
heater, pedal box, dashboard, windscreen wiper motor, front and rear lights, some
scratched glass and a tatty interior. The
engine and gearbox were sold and the chrome bumper front crossmember swapped for
a rubber bumper one. I purchased a twin circuit brake and clutch master cylinder
pedal box assembly, a rubber bumper steering rack and a collapsible column, the
original items were sold. The '72 dashboard was also sold and a late model MGB
version bought to suit the collapsible column. The seat runners were retained
but the remainder of the interior was thrown away. The glass was no use either
- there was not much left of the original GT. 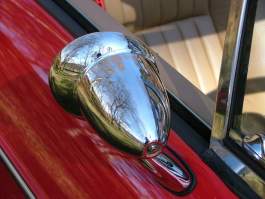
Bullet door mirrors are meant for a Mini but fit perfectly on the original
MGB mirror plinth. (Photo: Geoff King) Difficulties
with the new V8 Roadster shell
I placed my order for a special
V8 roadster shell with the fittings and brackets etc (or so I thought) for
the V8 engine, 5 speed gearbox and ancillaries. The shell would have apertures
in the inner wings for a RV8 style exhaust manifolds and I also specified a RV8
bonnet to give clearance for the fuel injection plenum chamber. The shell was
delivered in November 2000 finished in two pack Tartan Red and as it was lifted
off the trailer and pushed into my garage on that cold, dark evening it looked
wonderful with gleaming paintwork. Unfortunately, the next day a more careful
inspection revealed that the doors, boot and bonnet which were supposed to be
'fitted' were, in fact, simply 'attached' and many hours were spent getting the
panel gaps as even as possible. I was to find more and more defects with the shell
and I can only assume that I had an early version that still needed some |

development work. To be fair the supplier (or rather the shell manufacturer) paid
for the errors to be corrected but in my opinion they should not have been there
in the first place. There were too many defects with the shell to ignore but following
some correspondence with the supplier I was advised that I "should leave
a V8 conversion to the professionals"; however, having seen some of the
workmanship from so called craftsmen, I knew I could do at least as well if not
better. I would also have the satisfaction of doing it myself and for better or
worse I would do it my way. Building
the V8 Roadster
The build commenced; the uprated heater
and fan being the first items installed then the twin circuit brake master cylinder
and pedal box. The clutch master cylinder is a MGBGTV8 type with a metal reservoir
because a new plastic reservoir type didn't fit as the cap fouled the bulkhead.
To update the front suspension and brakes I modified the rubber bumper
type crossmember with a John Hoyle coilover damper conversion with unequal length
double wishbones replacing the standard lever arm dampers. 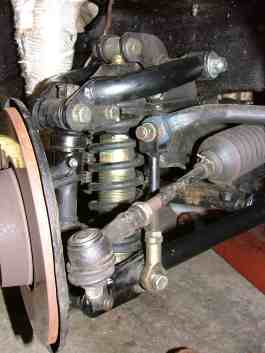
Front suspension with the coilover damper conversion and the lagged
RV8 exhaust above and behind the brake disc. (Photo: Geoff King) The
suspension has SuperFlex® bushes and is fully adjustable for ride height,
damper rate, and caster and camber angles. To complete the front suspension I
fitted a 7/8 inch anti roll bar and modified the steering with a 'quick rack'
assembly to reduce the number of turns lock to lock. For the brakes, Rover
SD1 non-vented, single line, 4 pot callipers were a relatively cheap and easy
brake upgrade. The big callipers were bolted on with thin wall sleeves (the holes
are metric, the bolts imperial) and connected with metric to imperial stainless
steel braided hoses. Solid ½ inch thick, 10.75 inch diameter MGBGTV8 discs
were used, they are |
the same diameter
as the standard MGB but thicker. The dust shield needed a very slight modification
because the SD1 calliper is larger than the MGB one but apart from that the callipers
just bolt on and the car looks as if it was originally manufactured with them.
I fitted the refurbished
rear axle, rebuilt with a 3.07:1 ratio crown wheel and pinion, but after
less than 500 miles the antiquated live axle and cart springs were sold and replaced
with John Hoyle's Independent Rear Suspension. Like the front suspension,
the IRS kit from John is a high quality product, well designed and manufactured.
The ride height, damper rate and camber are all fully adjustable and the bushes
are again SuperFlex®. Incidentally, all the bushes used in the front and rear
suspension are standard MGB size (front lower wishbone) so future replacements
should not be a problem. The total weight of the suspension is slightly more than
the live axle but the unsprung weight is much less. The tube axle assembly, springs
and dampers weighs close to 100 Kgs, 85 Kgs unsprung. The IRS is approximately
105 Kgs with less than 46 Kgs unsprung. 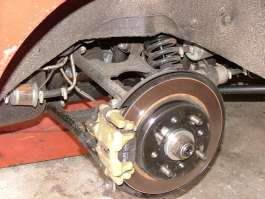
Rear suspension and disc brake conversion. (Photo: Geoff King) I
purchased a refurbished Sierra differential with 3.14:1 CW&P (the highest
standard ratio available), exchange-shortened drive shafts and new drive flanges,
dust shields, discs, pads, wheel bearings & seals and calliper overhaul kits.
A scrap Ford Scorpio donated its hubs, drive shafts and brake callipers; these
were refurbished prior to being reused. Assembly of the rear suspension was straightforward
with Sierra discs and rebuilt callipers; the completed sub-frame was then offered
up and bolted to the chassis. No new holes are necessary; the existing front spring
eye, the lever arm damper and check strap mounts are used - 8 bolts in total.
A new, heavy duty propshaft to mate the Rover LT77 gearbox to the Sierra diff
was purchased from GKN Driveline - suppliers of the original MGB propshafts. The
engine and gearbox went in easily but the RV8 style exhaust manifolds couldn't
be bolted on after the engine was in position, so engine had to come out again.
The manifolds couldn't |

be bolted to the engine first;
they had to be placed in the inner wing holes then the engine fitted and then
the manifolds bolted to the engine. 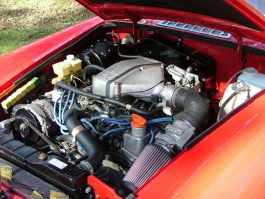
Engine bay is very neat with the injected V8 power unit. (Photo: Geoff
King) Electronic
fuel injection was obtained from a Range Rover, the ECU being from a 3.5 while
the plenum, hot wire airflow meter, manifold and injectors were from a 3.9. It
all fits under the RV8 bonnet, as you would expect, but only just. Considering
the wiring is from a Range Rover it all fits very neatly in the MGB with the ECU
mounted inside the cabin on the top of the passenger footwell. For the fuel
supply I used an early bolt-on tank, which has the fuel pipe in the tank side,
with a late fuel level sender which also has a fuel pipe, so as to have a flow
and return to the tank. A section approximately eight inches square was cut out
of the top of the new tank and a swirl pot from a Ford Granada welded inside.
I mounted a Bosch, high-pressure fuel pump together with a fuel filter on the
side of the battery box, the pump being level with the bottom of the fuel tank
because high-pressure pumps have poor suction. Stainless steel pipes were used
for the fuel supply and return and as the wiring harness was routed inside the
car the return fuel pipe uses the old supports and brackets for the wiring.
One of the problems with the new shell was that the radiator support
diaphragms were in the wrong place with the left side being some ¾ inch
further forward compared to the right making it impossible to fit the radiator.
The remote oil filter bracket was also incorrectly positioned so the supports
were cut off and new ones welded in place and painted again. I originally fitted
a standard MGBGTV8 radiator together with twin electric pusher fans but recently
replaced this with a high efficiency radiator from Clive Wheatley. For
the brake lines I used, or rather tried to use, an Automec copper pipe
kit but of course as my car is made from parts of various years and models very
little fitted. I ended up removing the gland nuts from the copper tube and cutting
Kunifer tube to the correct length. To avoid the exhaust I routed the front brake
pipes through the inner wings above the dampers - I haven't |
seen that on a B
before but it works perfectly and keeps the tube runs as short as possible and
away from the heat. I also routed the rear brake line and main battery cable up
the side of the tunnel beside the gearbox, well clear of the exhaust from the
right bank of cylinders. Interior
and trim
The car was now more or less mechanically complete so
on to the interior. I purchased a complete set of biscuit coloured panels and
carpets including the boot and fitted heating elements to the leather seats which
also have headrests. The combined door pulls and armrests are colour matched and
are similar to RV8 ones but are actually from a scrapped Vauxhall. The Vinylkote
custom colour aerosol was more expensive than the armrests themselves but the
colour match is perfect. 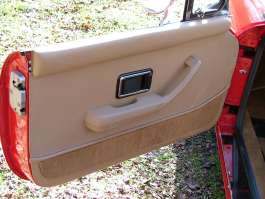
Door panels with the armrest from a Vauxhall sprayed with "Vinylkote"
to match the biscuit interior. Note no speakers or window winders in the doors
leave them looking very neat. (Photo: Geoff King) 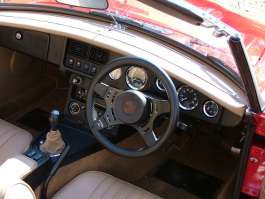
Cockpit looks just right! (Photo: Geoff King) I
fitted electric windows with the switches fitted to a small panel where
the ash tray is normally located. There is also remote central locking with an
immobiliser and alarm, and heated seats with switches in the central console between
the heater controls and the clock. I also have a CD radio cassette player with
an electric aerial in the rear wing and the speakers in the kick panel in front
of the doors with another two in the rear side panels just in front of the wheel
arch. The speaker covers are sprayed a biscuit |

colour to match the trim. A
six disc autochanger is in the boot. The dashboard is late model MGB with 3 separate
dials for fuel level, oil pressure and water temperature. All the gauges are new,
everyone seems to fit magnolia faced gauges but mine are black with chrome bezels.
I wanted the indicator switch on the left of the column so I fitted a late MGB
switch upside down on the left for main and dip beam, indicators and horn. The
switch on the right for wipers and washers is from a Mini, down is flick wipe
and up is the two speeds, press in for the washers. There is also a variable wiper
delay and wash wipe module. Both switch stalks are from a Mini so the graphics
are the correct way up and the car looks as if it left the factory like it.
First firing
and MOT test
I was pleasantly surprised when the engine fired up
at the first attempt but some underseal melted and dripped onto the exhaust filling
the garage with smoke during the first 20 minutes or so running in the cam at
about 2,000 revs. My wife thought the garage was on fire! On
the 2nd of August 2002 the car passed the MOT (first time of course) it had already
been inspected by the traffic police who checked the body and engine numbers,
I had also been interviewed by the police and issued with a new VIN by the DVLA.
My local MOT station checked that the new VIN was hard stamped into the shell
and the car was registered as an "MGBGT Convertible". Result
is a wonderful V8 Roadster
The engine runs at around 90oC with
occasional excursions to 95 or so and the modern suspension is excellent, driving
the car around the Highland roads is a real joy; no more front wheel patter on
rough surfaces, there is very little roll and the back end stays firmly planted
to the road. Axle tramp has been eliminated and on hard acceleration the car just
squats a little. The brake balance seems perfect with the four pot Rover SD1 callipers
at the front and single pot Sierra callipers at the rear. 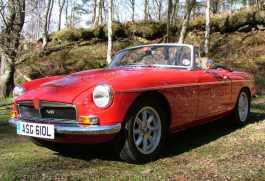
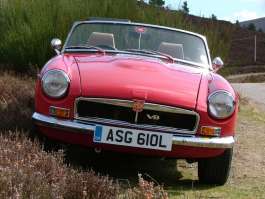
Externally the V8 Roadster looks standard with only the RV8 bonnet bulge
and V8 badges - but it is a thoroughly modern car and a delight to drive. (Photo:
Geoff King) Externally
my car looks almost standard, although the RV8 bonnet does have a bulge and the
single exhaust pipe is a little larger than an |
1800, there are
also a couple of V8 badges and the wheels are a little larger, however, under
the skin it is thoroughly modern and well able to keep up with everyday traffic.
It is fast and safe and I'm still driving everywhere with a big grin on my face.
From start to finish
the conversion of an old 1800 GT to a fuel injected V8 Roadster took some three
years. New components were purchased for repairs and safety critical items but
I used scrap yards and second-hand parts wherever possible and many items were
purchased from the MG spares day at Stoneleigh 450 miles from home. I bought a
new shell because I converted a GT to a roadster and the GT donor was a basket
case destined for the scrap yard I also wanted as strong a shell as possible for
the V8 power not one riddled with rust. Despite recommendations that the project
should be left to the professionals only the paintwork was carried out by specialists.
Everything else, and I mean everything, I repaired, rebuilt, modified and uprated
myself.
Would I do it again? Without any hesitation or doubt yes,
but my wife wouldn't like it!
Roadster
shell difficulties
John Yea at the BMH Body Plant at Witney (an MGV8 enthusiast himself and a member
of the V8 Register) has checked and confirms "the shell was purchased
in November 2000, a year before the present management team took over. Today we
have a documented customer complaints procedure which tracks a complaint from
initial contact to final resolution. However this system did not exist in 2000
and there are no records of either the detail of the complaint or what solution
or resolution resulted. I think the case is further complicated in that the shell
was supplied painted, which means the painter possibly removed some, or maybe
all, the bolt on panels". From the specification of the bodyshell, John
was able to identify the trader through whom the shell was sourced and staff there
do remember Mr King and this particular shell and recall that BMH did in fact
give some financial compensation. Their view is that the problems were not typical
of the build quality at that time and that the V8 Roadster Conversion bodyshell
is now produced to a consistently good quality. They purchase a reasonable number
of these shells which they either build up in their workshops or supply for customers-builds.
In 2003 members of the V8 Register toured the BMH Witney Body Plant
as one of the events in the V8 25th Anniversary Week. The V8 group was made very
welcome by the whole team and it was very clear the workforce saw quality as a
top priority. |
| |